Shopify app:
Getting started
Loyalty & Rewards
1. Make rewards visible to customers
Your customers will not know about your loyalty program unless you tell them. For that purpose, Monetha plugin includes a small block that indicates how many loyalty points your customer will get with a particular product and their current cart.
Depending on your theme, there are 2 ways to add the “Monetha block” to your online store.
- “1.1 Customize Theme method” if you use a theme compatible with Shopify’s native Theme Editor
- “1.2 Edit Code method“, if you use a theme NOT compatible with Shopify’s native Theme Editor.
1.1 Customize Theme method
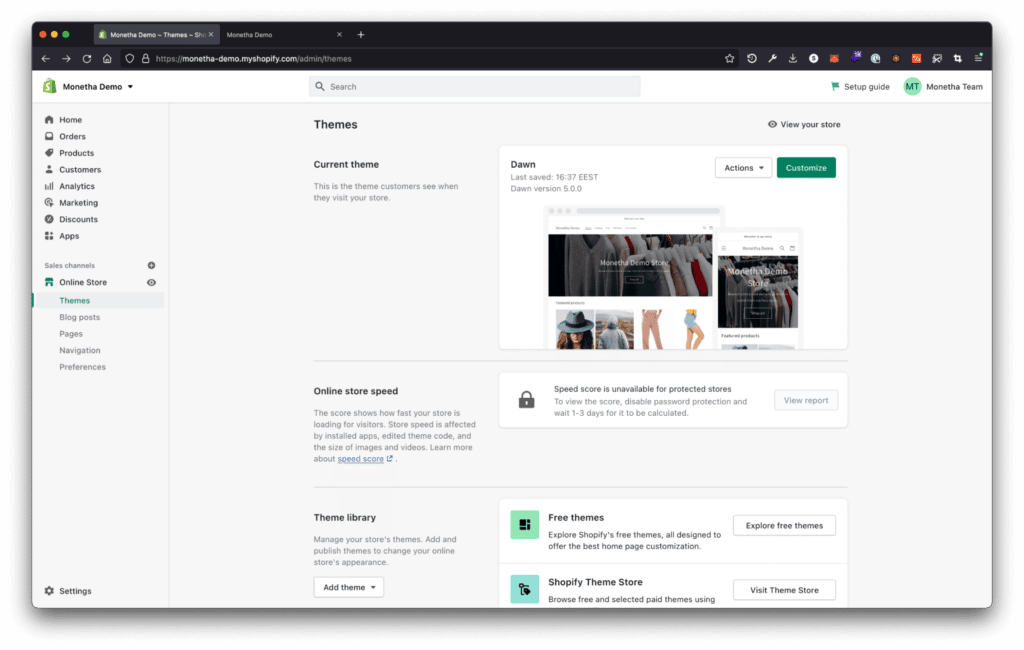
To display rewards on your theme, go to your Online Store “Theme” section and click “Customize.”
1.1.1 On your Product page
Go to your Product page template.
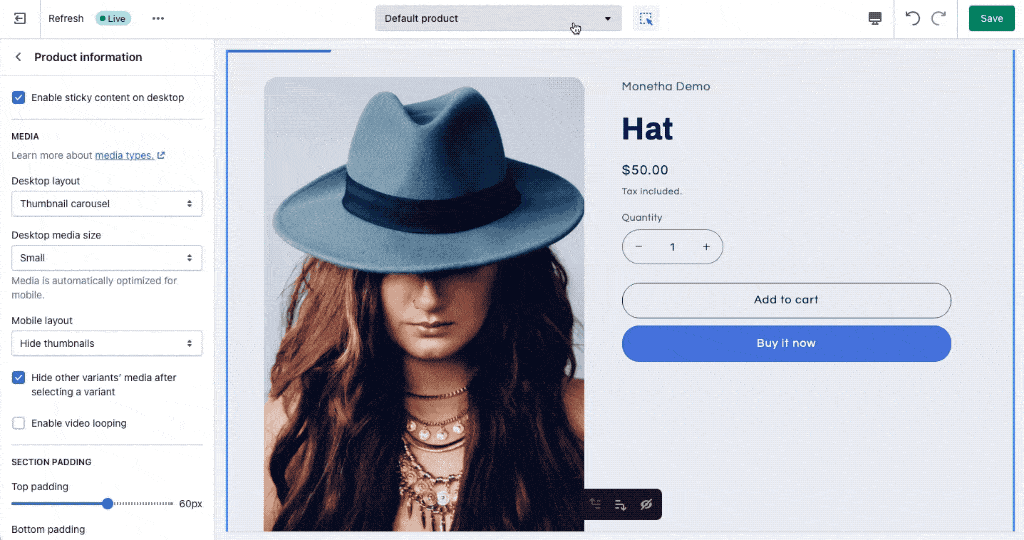
On the left, select the area where you want to add the Monetha block, click “Add block” and select “Rewards”.
We suggest adding the block below the “Add to cart” or “Buy” call-to-action buttons.
Click “Save”.
1.1.2 On your Cart page
Go to your Cart page template and repeat what you’ve just done for the Product page.
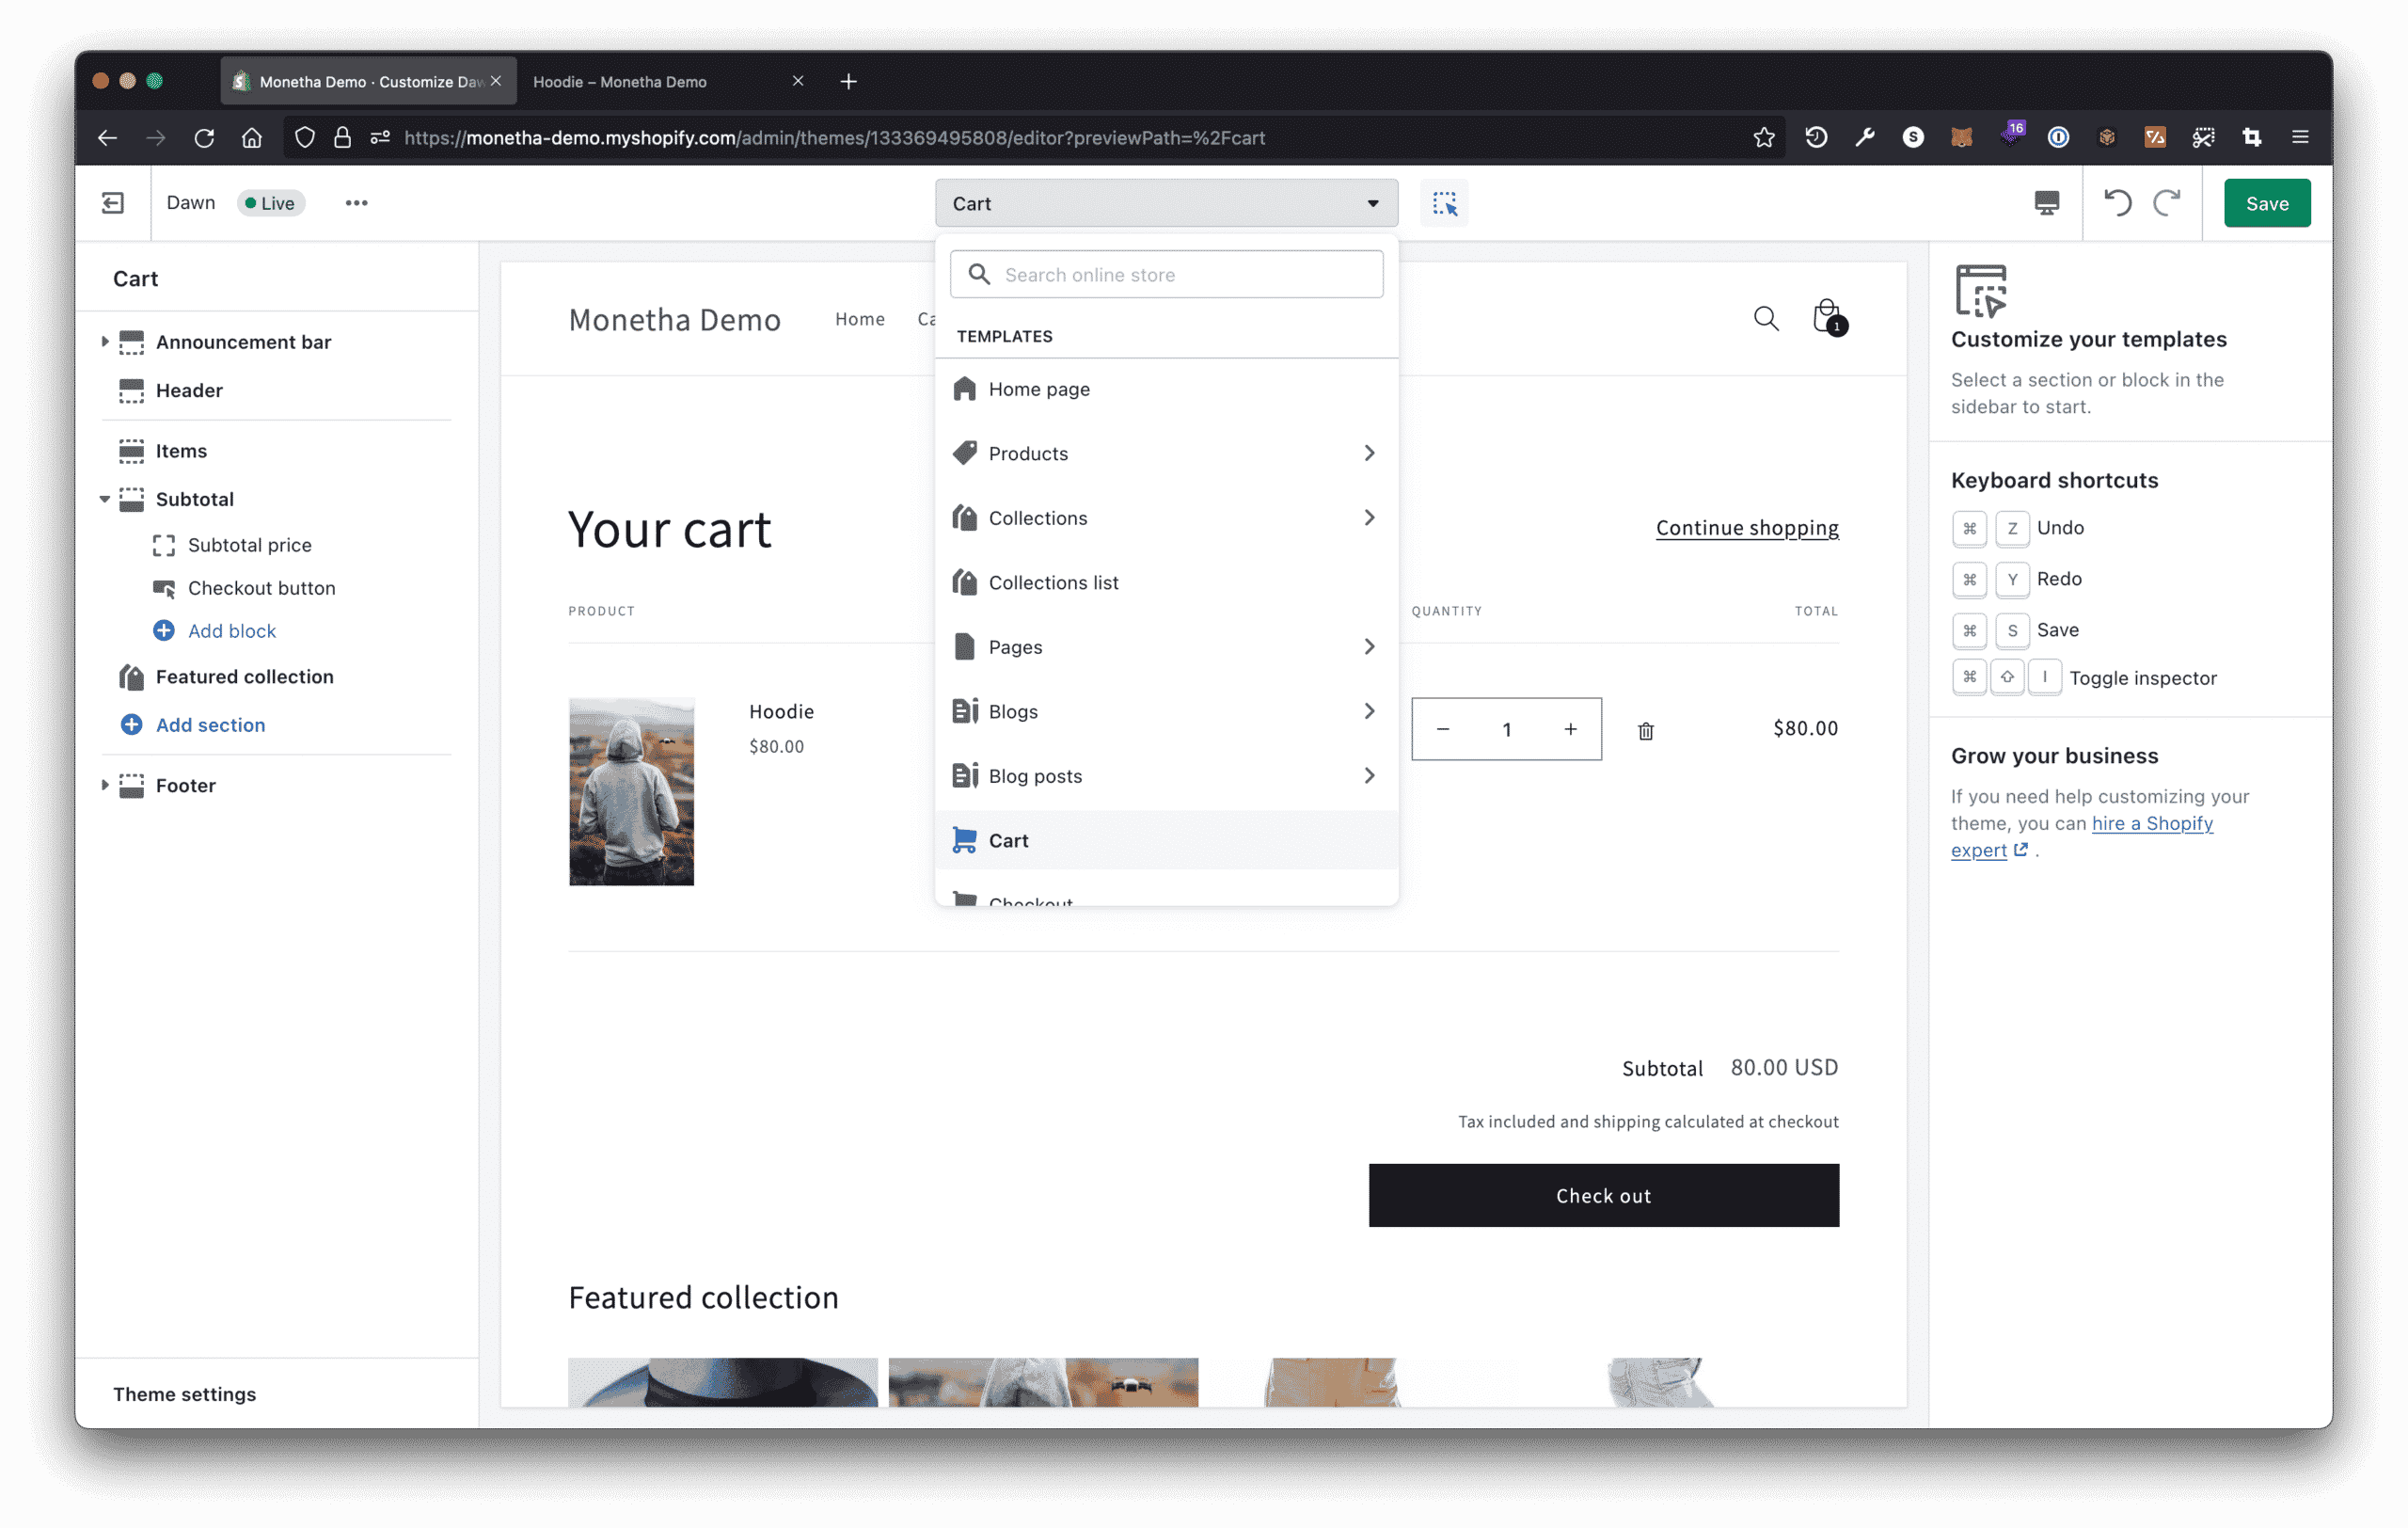
We suggest adding the block below the “Check out” call-to-action button.
Click “Save”.
1.1.3 Designing the block (optional)
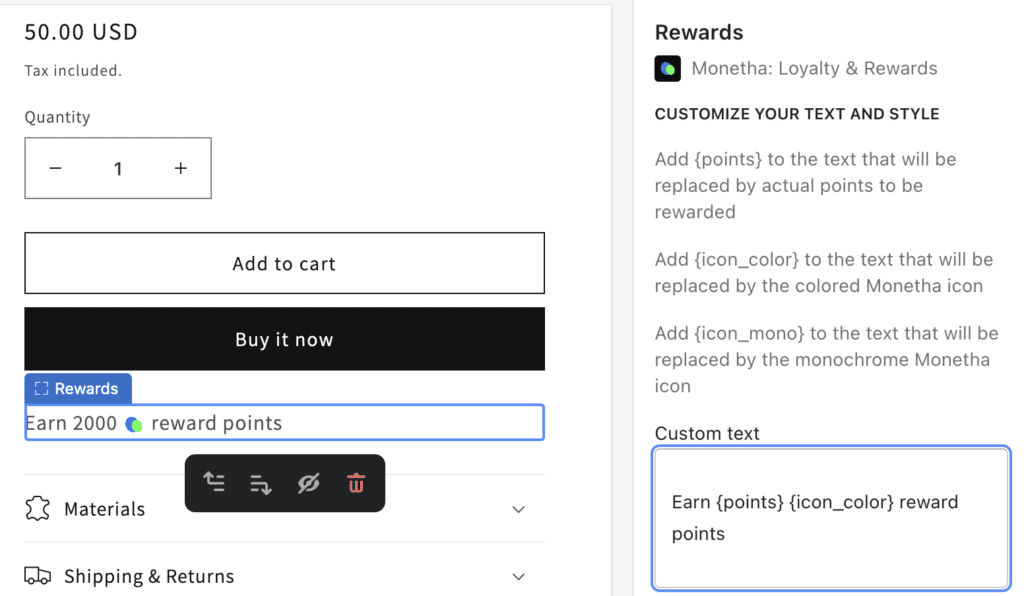
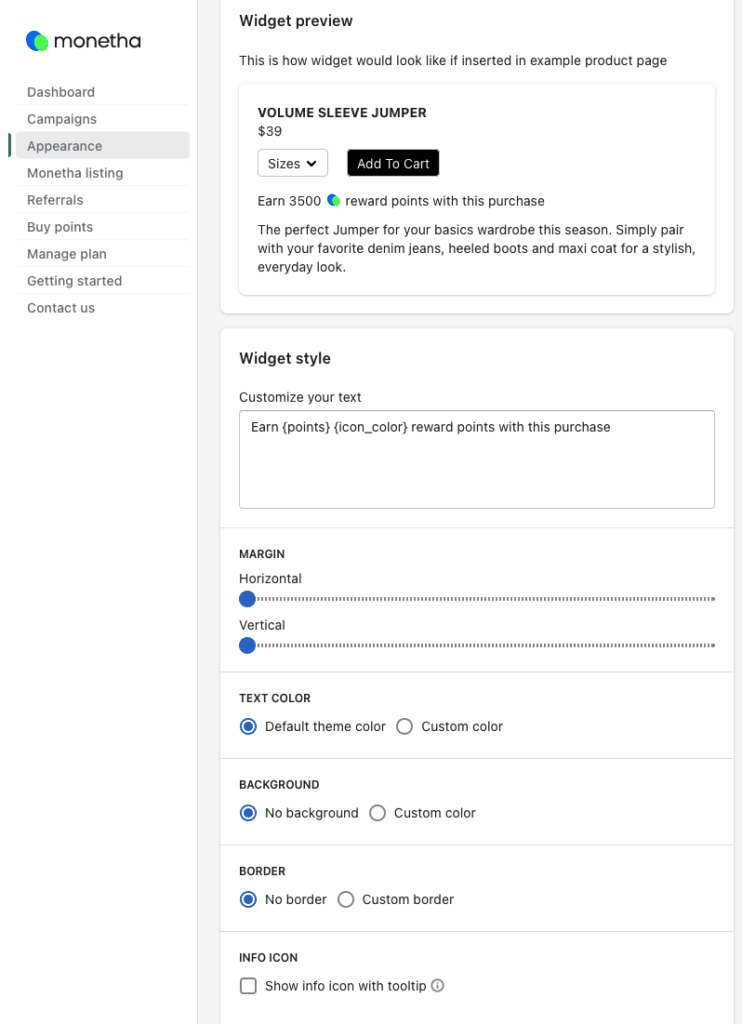
By default, the block inherits your theme’s colors, but you can customize them together with other parameters.
Select the block, and you’ll see the following options on the right:
Custom text
Enter the text you want in the Custom text field.
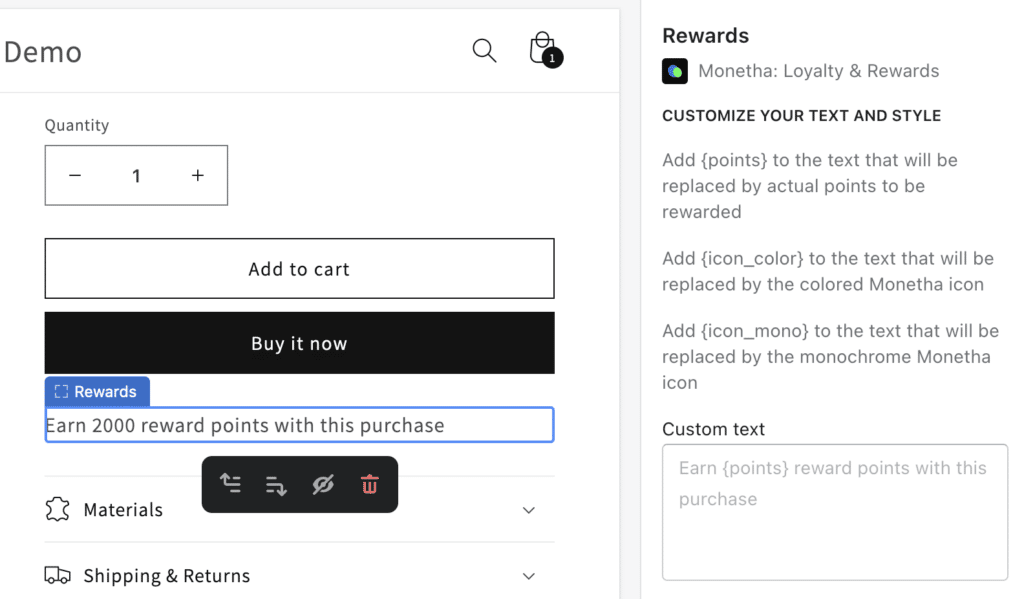
You can add special parameters to dynamically show points or icons:
{points}= amount of points{icon_color}={icon_mono}= ~
Example:
Earn {points} {icon_color} reward points
will transform into
Earn 2 000 reward points
Show info icon tooltip

You may enable a tooltip to give users more information about the loyalty program.
This will show an info icon at the end of the text which will reveal a tooltip saying “Learn more about Monetha.”
Horizontal and Vertical margins
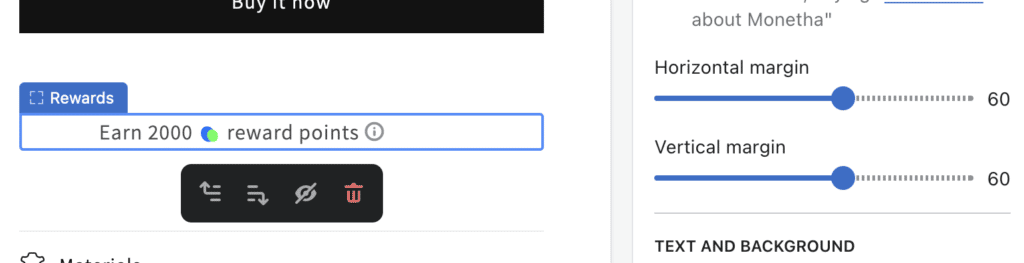
Adjust spacing around the block.
Text and Background color
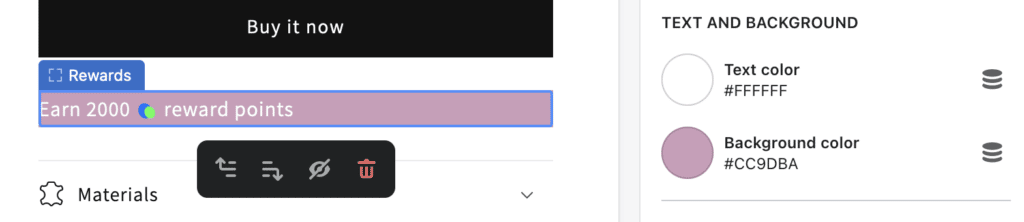
Customize color of the text and the background of the block.
Border
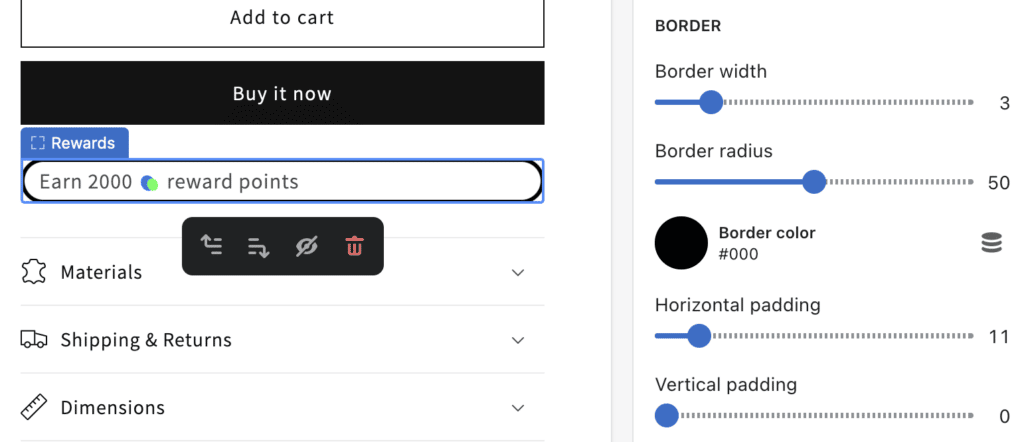
Border width will add a border and adjust its thickness.
Border radius will round the corners.
Border color will adjust the color of the border.
Horizontal and Vertical paddings adjust spacing within the block.
1.2 Edit Code method
This method is more technically advanced and requires basic knowledge of code.
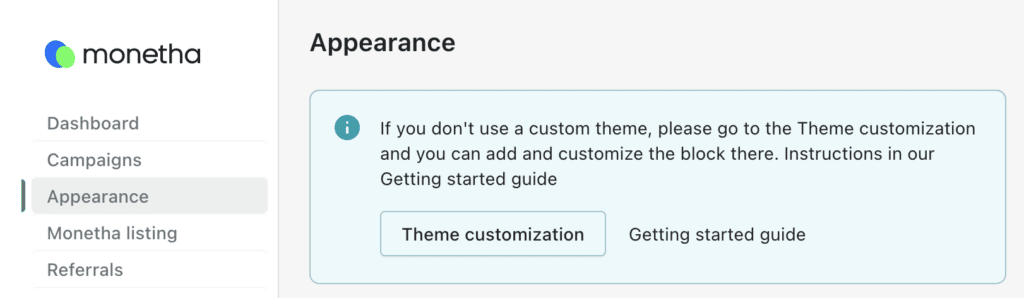
1.2.1 Customize Appearance
In the Monetha: Loyalty & Rewards app, go to the Appearance page.
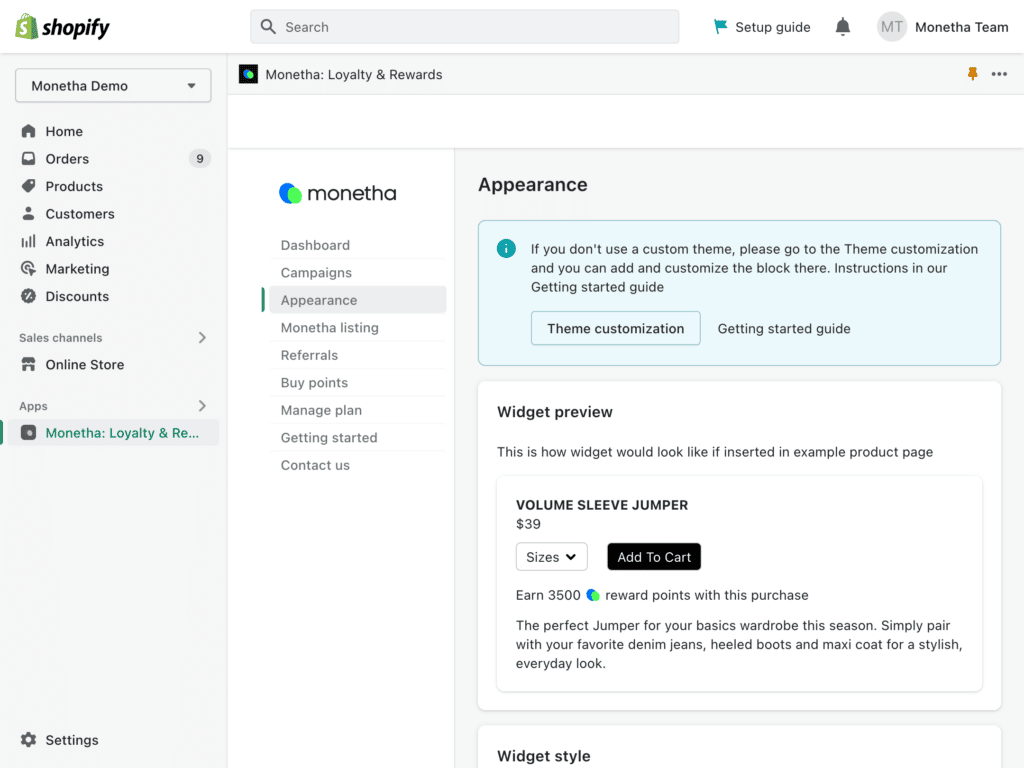
1.2.1.1 Designing the block (optional)
By default, the block inherits your theme’s colors, but you can customize them together with other parameters.
All available options are described in the above section Designing the block.
1.2.1.2 Copy HTML output block
Once you’re happy with the appearance of the block, you can copy the “HTML output block” at the bottom of the page.

Now, let’s insert it into your store theme.
1.2.2 Edit your Theme
At the top of the Appearance page, click “Theme customization.”
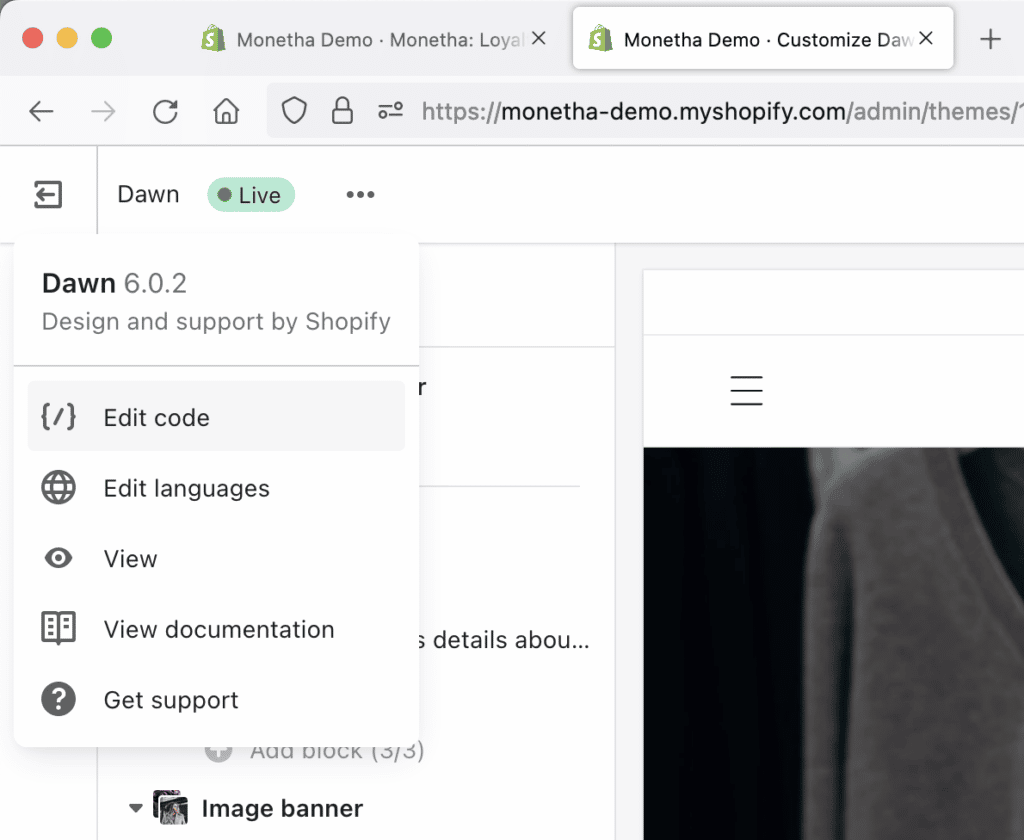
1.2.2.1 Go to {/} Edit code
In the newly opened tab, click the 3 dots “…” at the top left of the page and click “{/} Edit code”
1.2.2.2 Add code to your Theme
In the newly opened tab, find the desired .liquid file where you would like to insert the HTML block output snippet (read more).
Let’s say you want to insert the widget on the product page, just above the product description
On “Dawn” theme (and any other new default Shopify theme), the Product page is represented in Sections -> main-product.liquid.
Open that file and find the place in the code where the description is rendered. In the example below, it is on line 243. The code {%- when 'description' -%} indicates the beginning of the description block.
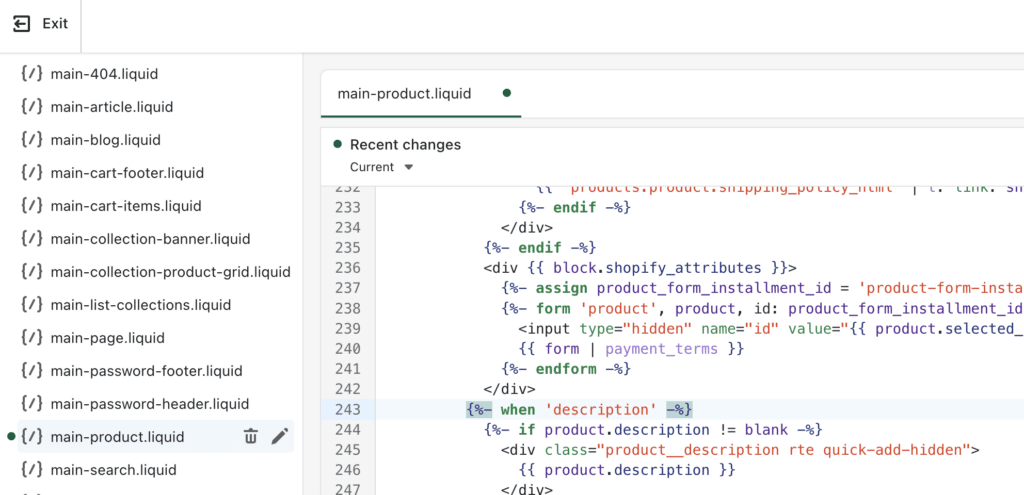
Paste the snippet “HTML code output” right after this line.
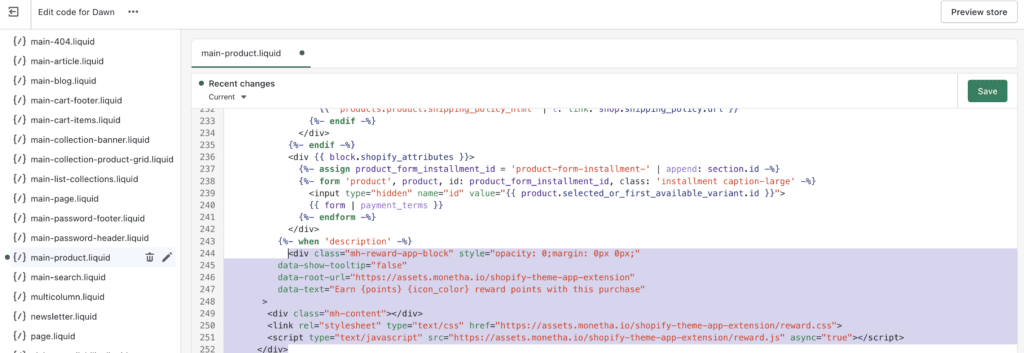
And click “Save.”
1.3 Done
The widget is now ready. But you won’t see it until you have an active loyalty campaign.
2. Configure your rewards program
Now, when the visual part is set up, let’s configure how loyalty points shall be rewarded.
First, we need to get to the plugin’s dashboard.
Can’t wait to start? You may skip the overview and go directly to Start a new Campaign.
First, we need to get to the plugin’s dashboard.
Can’t wait to start? You may skip the overview and go directly to Start a new Campaign.
2.1 Dashboard
This is where you can oversee the status and performance of your Rewards program. Let’s quickly check what’s in here.
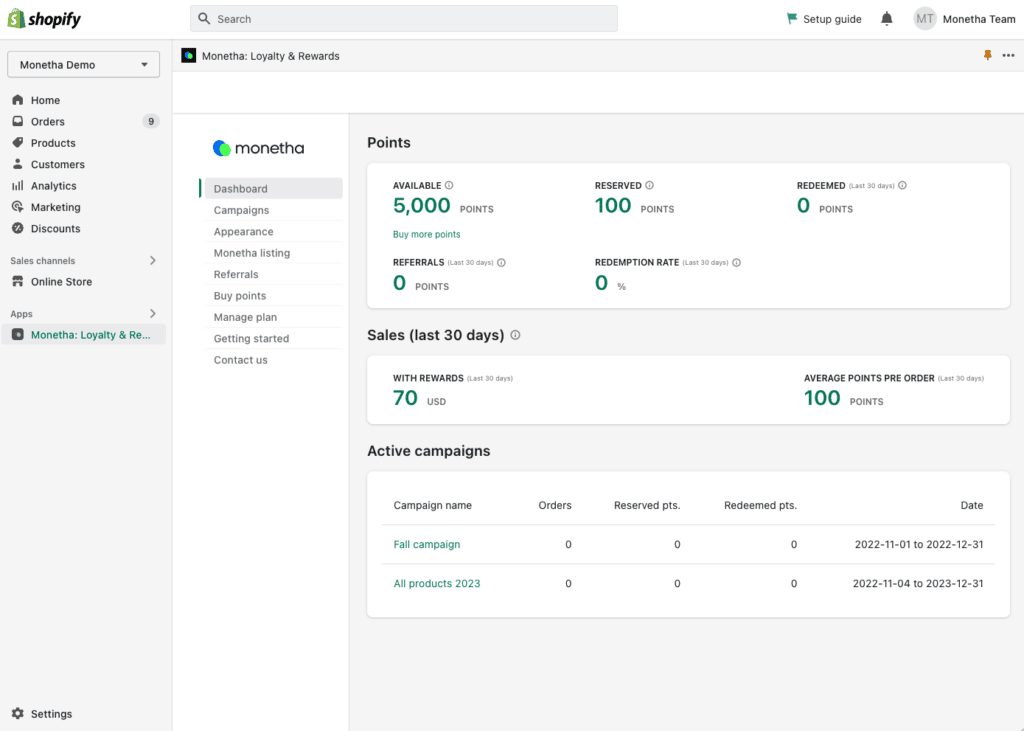
Points available
Points available are points that you have in your balance, ready to distribute to your customers. In the free plan, you will start with 5,000 points. If you run out of them you can always purchase more (See “Buy Points”) or Upgrade your plan to have more points included every month (See “Manage Plan”).
Points reserved
Points reserved are points that are rewarded (distributed) to customers after they purchased in your store but aren’t claimed yet. Customers have 30 days to claim their points in the Monetha mobile application (available both on iOS & Android).
Unclaimed points will be credited back to your Points available balance after 30 days.
Points redeemed
Points redeemed are points that have been claimed by your customers in the Monetha app.
Points for Referrals
Points that are credited to your available balance whenever your bring a new user to the Monetha app. A thank you from us to you.
Redemption rate
Rate of Points redeemed over the Points reserved (distributed).
Sales
Overview of Sales generated from items targeted by rewards campaigns
Active campaigns
This section lists the Rewards campaigns currently running on your online store. You can click on any of them to see their Details.
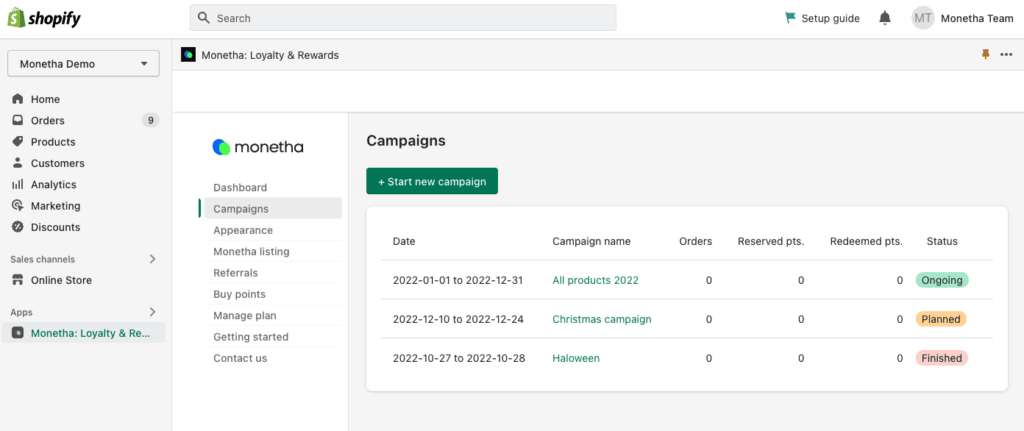
2.2 Campaigns
This section will give you a more detailed view of your campaigns Ongoing, Planned, or Finished.
This is also the place where you start new campaigns. Time to create one!
Click “+ Start new campaign” button.
2.2.1 Start a new campaign
We are at the final step. Now you only need to come up with the name for your campaign, set up timeframe for it, and set rules for points attribution.
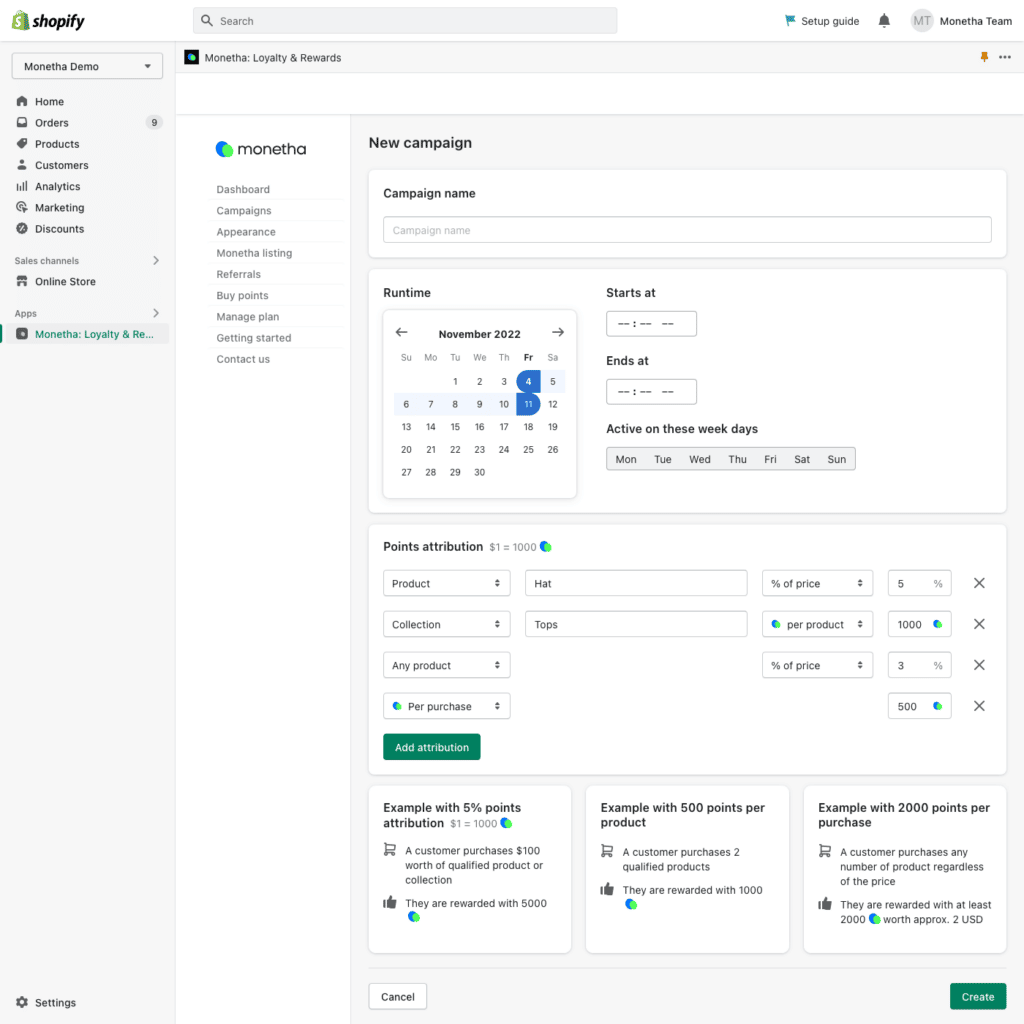
Runtime
The campaign can run as long as you want, from minutes to years.
In the date picker, click a date to select as your Start date, then click a second date to select as your End date.
In the Start at and End at fields, you can pick the exact time the campaign will launch on the Start date and Finish on the End date.
Campaigns can also be set to only be Active on certain week days.
Example: you set up a campaign to start on the 1st of November 2023 (happens to be a Wednesday) and end on the 14th of November 2023 (a Tuesday) and only run on Fridays. The campaign will only be active on Friday 3rd and Friday 10th of November 2023.
Point attribution
Here you can adjust how many rewards you will be giving and for what kind of purchases.
You can reward customers for every purchase or specific products/collections only and set up a rewards level for each independently.
For example, you choose 1% as a base reward level — 1% of any purchase will be rewarded in loyalty points. But you also want to give 3% for a slow-moving category and 5% for a high-margin product. Easy!
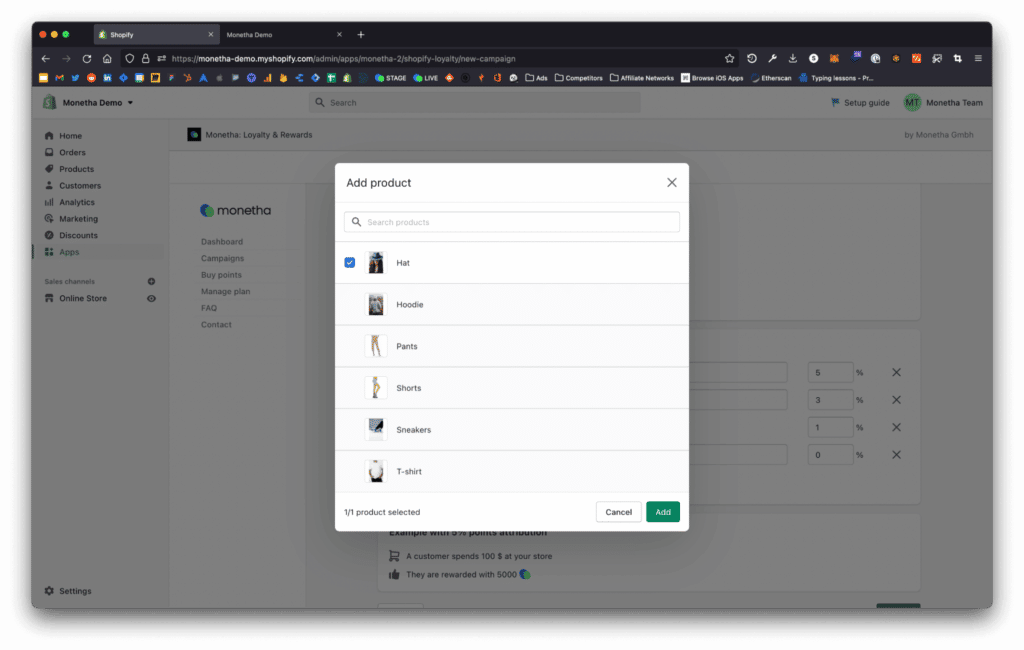
To attribute Points to a specific Product, a specific Collection, Any product, or on a Per Purchase basis, select the option from the dropdown and then Click to Select. A popup will appear where you can choose the element you want and Add to your campaign. Then simply pick a percentage of rewards.
A few nuances
If a Product is targeted by several different Point attributions, the one most precisely targeting the item will be picked.
If a Product is targeted by several different campaigns, the one with the earlier expiration will be applied.
Understanding percentages
Consider that 1000 Points is equal to 1 USD. By attributing 7% to a product, we will convert the price of the item from your currency to USD and then apply the relevant Attribution percentage.
“Price of the item in your currency” x “Exchange rate to USD” x “Attribution percentage” x 1000
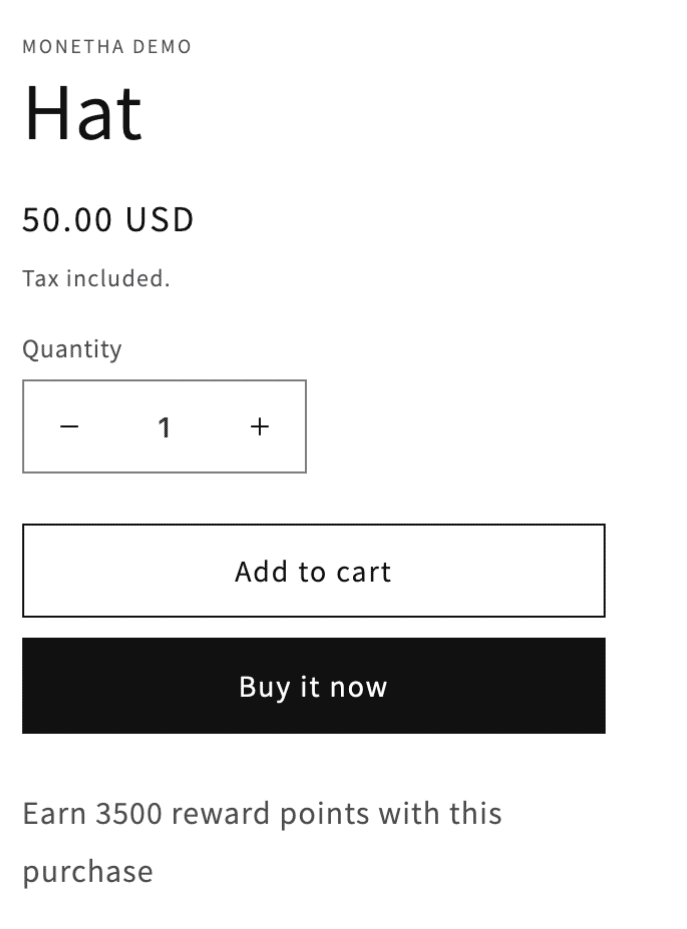
Example:
With a 7% points attribution, on a product that cost 50 USD
“50 USD” x “7%” x 1000 = 3500 Points
3. Loyalty discounts — Accept loyalty points as a payment method
Loyalty discounts feature allow your customers to spend their Monetha loyalty point at your store. Points they spend are transferred to your balance.
Accepting loyalty points as a payment method closes the loyalty cycle and encourages customers to return and make repeat purchases. They are more likely to stay engaged with your brand and remain loyal over the long term.
Let’s get started with the setup!
3.1 Turn on Loyalty discounts
Access the Monetha plugin in your Shopify admin panel.
Navigate to the Loyalty discounts section.
Specify the percentage of the order price that can be paid with loyalty points. You can choose 100% for full payment or set a cap, such as 5%.
Enable discount Combinations with Order discounts for the specific discounts you want to allow customers to use alongside loyalty points.
3.2 Add Discounts widget to Cart page
Navigate to the Widget builder and click Edit theme.
On the theme customization page, switch to the Cart page.
Add a widget block at the desired location for the Loyalty discounts widget.
Select Discounts widget from the list of App blocks.
Customize the appearance and content by adjusting settings, such as adding a bottom margin to the Rewards widget above it.
Save your progress. Your changes will be applied immediately.
3.2 Add Discounts widget to Drawer cart
The Drawer cart type is different as it lacks a visual editor, requiring the use of the Vintage functionality to add a Discount widget.
It might feel a bit confusing to work with the code editor, but the good news is that you can customize the Discount widget in the Monetha plugin and then simply copy-paste the code.
Here is how to achieve that in a few steps:
Navigate to the Widget builder and click on Vintage tab.
Click on Create widget and select Discounts.
You can use the default widget description or personalize it according to your needs. Once done, hit the Create button.
- After creating your widget, copy the code generated in the HTML output block.
- Return to the previous screen and select the Edit theme button.
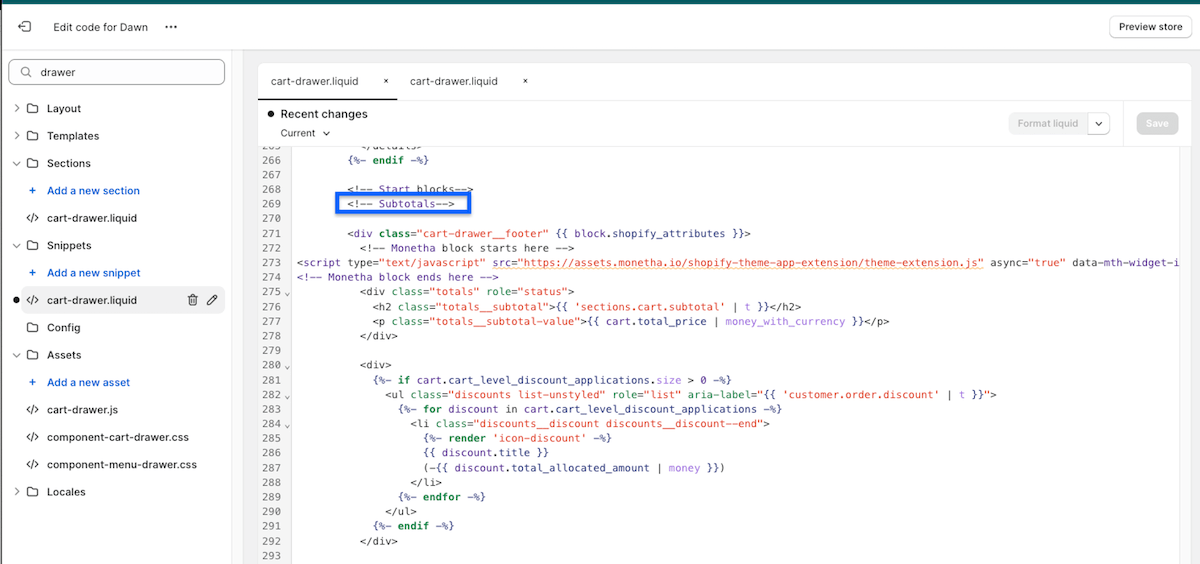
- In the top menu, click on the three dots and select Edit code.
- Use the search, type drawer, and pick the file named cart-drawer.liquid. If there are multiple files, choose the one containing HTML code, which might be under the ‘Snippets’ menu.
- Paste the copied code into the desired location in the HTML code. We recommend adding it after the
</cart-drawer-items>tag or in the<!-- Subtotals -->section.
Questions?
If you have any questions or need any support, please feel free to contact us at [email protected].